Snorkeling with Dagger 2
Dagger is a popular library for Java, it makes writing code much easier and more structured. In this article I will describe how can we benefit of using it, show some simple use cases and explore the generated code. As a bonus, I will show an advanced trick that makes Dagger 2 much more flexible.
Introduction: what the hell is Dagger and how can I benefit of using it?
What is Dagger
Dagger is a java library that provides an alternative way for objects instantiation.
Instead of passing one zillion of arguments with constructor you can just
annotate your fields with @Inject annotation and all required objects will
be created and assigned automatically.
@Inject SharedPreferences pref;
This is done by a source code generation - you annotate some fields, Dagger will create some code that will fill that fields.
You can always check the generated code in the build folder.
Think of Dagger as of a Java language extension. While normally object-oriented languages have a lots of problems with objects creation, storage and passing them around, Dagger provides an elegant solution.
History
Dagger has been developed by Square, Inc guys: square.github.io/dagger
Dagger 2 is a fork of Square’s Dagger that has been developed by Google and has been used on performance critical projects: github.com/google/dagger
Benefits: Singleton
On Android one of the typical tasks is to create a single SharedPreferences object and share it through all the application.
It is required in an activity, in a fragment, in a custom view. Typical solution is to keep that SharedPreference inside of Application object
and create a getter for it. Then, your code will look like this:
public class MainActivity extends Activity {
    SharedPreferences pref;
    Gson gson;
    ServerAPI api;

    onCreate(...) {
        MyApp app = (MyApp)getContext().getApplicationContext();
        pref = app.getSharedPreferences();
        gson = app.getGson();
        api = app.getApi();
One day you will find that MyApp is bloated with stranger things that have no any relevance to MyApp. Or you may find yourself using ugly
Singleton pattern everywhere. Now, think about refactoring. You’ve decided to move Gson away from MyApp into MyNetwork.
How many lines of code you will need to change?
Dagger way:
public class MainActivity extends Activity {
    @Inject SharedPreferences pref;
    @Inject Gson gson;
    @Inject ServerAPI api;

    onCreate(...) {
        MainInjector.inject(this);
Now we do not care about where to get all that stuff - it will be created for us. Gson could be inside of MyApp object.
It also could be somewhere in MyNetwork.Parsing.Processor. We just require Gson! Yes, we need to instruct Dagger how to get Gson once,
but later we will be able to share it all over the application with @Inject annotation.
Benefits: Order of objects instantiation
Another problem we have is the order of objects instantiation. Say, we have
ServerAPI, Gson, DateConverter, AuthenticationManager, SharedPreferences and 50 other objects that we need to initialize.
One day we’ve decided to make some refactoring, and we’ve lost track of what should be initialized in which order.
Null pointer exceptions everywhere! Stack overflow because of circular constructor calls! What have I done? git reset --hard!
But Dagger manages the order of objects instantiation and warns you about such problems during compile-time.
Benefits: Passing constructor arguments that are not required for the object
How about this example?
onCreate(..) {
    authManager = new AuthManager(((MyApp)getContext().getApplicationContext()).getGson());

AuthManager(Gson gson, SharedPreferences pref) {
    new Network(gson, pref, serverTokenProvider);

Network(Gson gson, SharedPreferences pref, ServerTokenProvider tokenProvider) {
    super(tokenProvider)
    new ServerAPI(gson, pref, tokenProvider);

ServerAPI(Gson gson, SharedPreferences pref, ServerTokenProvider tokenProvider) {
    new RestAdapter(gson); // Finally!
Dagger way:
class ServerAPI {
    @Inject SharedPreferences pref;
    @Inject Gson gson;
    @Inject ServerTokenProvider tokenProvider;
Or even better:
class ServerAPI {
    @Inject RestAdapter restAdapter;
Other benefits
Unit tests
With Dagger it is very easy to inject one object instead of another for the sake of unit-testing.
Integration tests
You can easily substitute any part of your application. In example, you can inject a network interface that will provide an application with mock data, failure responses and delays to simulate poor network connection and incorrect server responses.
Here is an example: U+2020
Scopes
With Dagger injections can be bound to a specific part of an application. In example, you can inject activity-related
objects such as DrawerController and ActionBarController and when an activity dies, you can automatically release references
to objects inside Dagger that have been associated with this activity, so sharing of activity-related objects can be done without memory leaks.
Another example is to hide all authentication-related objects (a network cache, a balance, an access token) when user logs out, so all successive activities will get fresh objects in unauthenticated state.
Objects decoupling
It is hard to build a multi-object environment where all components are tightly coupled. In example,
if every component that has access to SharedPreferences should know how to create SharedPreferences instance
or where to get it then if something changes you should trace all objects that are using
SharedPreferences and change their behavior. With Dagger the code that initializes SharedPreferences
lives in a different place of where SharedPreferences are used. So there are less connections between
objects and refactoring can be made easy.
Declarative programming style
Declarative programming means that when you’re writing a program you’re declaring what is going on, rather than how this code is connected with other parts of your program and what is going next. Amount of bugs that can be avoided with the declarative programming style is tremendous. On Android it is not easy to understand how this could be done because we have so many callbacks and lifecycles that needs to be taken into account, but Dagger helps at least with the objects instantiation.
Installation
Dagger consists of two parts - a compiler that will generate the injection code and a very little runtime library.
You will also need to include that two javax.* additional libraries Dagger 2 depends on.
dependencies {
    compile 'javax.inject:javax.inject:1'
    compile 'javax.annotation:javax.annotation-api:1.2'
    compile 'com.google.dagger:dagger:2.0'
    provided 'com.google.dagger:dagger-compiler:2.0'
}
Basic example
Simple injection with @Inject constructor
Let’s create a simplest possible example. We will inject PreferencesLogger - an object that will log all SharedPreferences values.
public class PreferencesLogger {

    @Inject
    public PreferencesLogger() {
    }

    public void log(Context context) {
        SharedPreferences pref = context.getSharedPreferences("preferences", 0);

        Log.v(getClass().getSimpleName(), "Logging all preferences:");

        for (Map.Entry entry : pref.getAll().entrySet())
            Log.v(getClass().getSimpleName(), entry.getKey() + " = " + entry.getValue());
    }
}
@Inject says to Dagger that this constructor will be used to instantiate PreferencesLogger object. The current implementation
is quite stupid but we will make SharedPreferences to be passed to the PreferencesLogger’s constructor later and it will look a little bit better.
Injection
Here is how we want to use PreferencesLogger:
public class MainActivity extends Activity {
    @Inject PreferencesLogger logger;

    @Override
    protected void onCreate(Bundle savedInstanceState) {
        super.onCreate(savedInstanceState);

        MyApplication.inject(this);

        logger.log(this);
    }
}
Code generation
Are you curious how MyApplication.inject looks like? No, you can’t see it right now. :D At first you need to see a little picture.
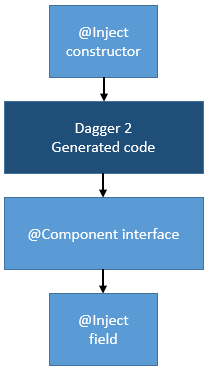
While working with Dagger 2, we need to keep in mind how it is composed. You know about @Inject constructor, so next
thing to know about is @Component. Component is an interface marked with @Component annotation that shows
to Dagger 2 into which objects we want to inject.
@Component
public interface AppComponent {
    void inject(MainActivity activity);
}
@Component says to Dagger 2 that it should generate code for injection into MainActivity.
After we wrote all this, we press Build button to make Dagger 2 generate an AppComponent implementation.
Finally: the injection code
public class MyApplication extends Application {
    private static AppComponent component;

    @Override
    public void onCreate() {
        super.onCreate();
        component = DaggerAppComponent.builder().build();
    }

    public static void inject(MainActivity target) {
        component.inject(target);
    }
}
DaggerAppComponent is a generated class of type AppComponent that we need to access the generated code.
The IDE can not see this generated class and marks it as red, but later I will show how to deal with this problem.
Now we have a complete workable example! :)
Yes, Dagger requires a little bit of work to do at the beginning. But think about advantages it can give! On my average project I have about 50 objects that need to be shared across an application. Amount of code rewrites Dagger saves for me is incredible! Before Dagger I always avoided refactoring whenever possible. Now I refactor quickly and easily, without side-effects or broken connections between objects.
I hope you’re still alive at this point. If so, let’s study some advanced topics.
Exploring the generated code
Let’s take a look at what has been generated. I’ve stripped out all code that does nothing, to not bloat this quickie guide. :)
public final class DaggerAppComponent implements AppComponent {
    private MembersInjector mainActivityMembersInjector;

    private DaggerAppComponent(Builder builder) {
(3)     initialize();
    }

    public static Builder builder() {
(1)    return new Builder(); // Builder instantiation
    }

    private void initialize() {
(4)    this.mainActivityMembersInjector = MainActivity_MembersInjector.create(MembersInjectors.noOp(), PreferencesLogger_Factory.create());
    }

    @Override
    public void inject(MainActivity activity) {
(9)   mainActivityMembersInjector.injectMembers(activity);
    }

    public static final class Builder {
        public AppComponent build() {
(2)        return new DaggerAppComponent(this); // DaggerAppComponent instantiation
        }
    }
}

public final class MainActivity_MembersInjector implements MembersInjector {
    private final MembersInjector supertypeInjector;
    private final Provider loggerProvider;

    public MainActivity_MembersInjector(MembersInjector supertypeInjector, Provider loggerProvider) {
(7)     this.supertypeInjector = supertypeInjector;
(8)     this.loggerProvider = loggerProvider;
    }

    @Override
    public void injectMembers(MainActivity instance) {
(10)   supertypeInjector.injectMembers(instance);
(11)   instance.logger = loggerProvider.get();
    }

    public static MembersInjector create(MembersInjector supertypeInjector, Provider loggerProvider) {
(6)  return new MainActivity_MembersInjector(supertypeInjector, loggerProvider);
    }
}

public enum PreferencesLogger_Factory implements Factory {
    INSTANCE;

    @Override
    public PreferencesLogger get() {
(12)   return new PreferencesLogger(); // @Inject annotated constructor call
    }

    public static Factory create() {
(5)    return INSTANCE;
    }
}
No comments has been generated but it is quite obvious how this simple code works. I’ll just put here some referenced code that can confuse by its absence.
public interface Factory  extends javax.inject.Provider {
}

public interface Provider  {
    T get();
}

public interface MembersInjector  {
    void injectMembers(T t);
}

public static  MembersInjector noOp() {
    return (MembersInjector) NoOpMembersInjector.INSTANCE;
}

private static enum NoOpMembersInjector implements MembersInjector {
    INSTANCE;

    @Override
    public void injectMembers(Object instance) {
    }
}
How you have a little task to do: trace visually all steps that will be made by executing this code:
DaggerAppComponent.builder().build().inject(MainActivity.this);
What is going on here?
- A statical
DaggerAppComponent.builder()call creates aBuilderinstance; Buildercreates anDaggerAppComponentinstance;DaggerAppComponentcreates aMainActivity_MembersInjectorinstance;MainActivity_MembersInjectorusesPreferencesLogger_Factoryto instantiatePreferencesLoggerand injects it intoMainActivity.
OK, at this point you should understand the basics of how Dagger 2 works, it is time to drink some tea. Take a break and continue 15 minutes later. :D
Injection of third-party classes
A Module definition
A module is a part of your application that provides some functionality,
while a component is a part of your application that consumes some functionality.
You can have any number of modules, for example you can create DatabaseModule, NetworkModule, MainActivityModule, etc.
The same can be said for components.
Let’s create our next example around sharing a SharedPreferences object.
At first, we need to somehow say to Dagger how we want to instantiate SharedPreferences.
We obviously can not mark it’s constructor with @Inject, so we do this by creation a Module class like this:
@Module
public class AppModule {
    private static final String PREFERENCES_FILE_NAME = "preferences";

    private MyApplication app;

    AppModule(MyApplication app) {
        this.app = app;
    }

    @Singleton
    @Provides
    SharedPreferences provideSharedPreferences() {
        return app.getSharedPreferences(PREFERENCES_FILE_NAME, 0);
    }
}
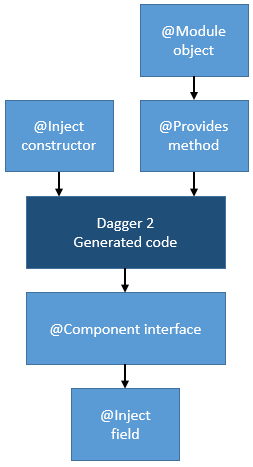
@Module says to Dagger that this object will be used for objects instantiation.
@Provides means that this method should be called to instantiate an object.
@Singleton means that the object should be reused for injection into other objects.
Here is a little diagram of how Module is being used by Dagger 2:
New PreferencesLogger
Now we do not want to instantiate SharedPreferences inside of PreferencesLogger,
now we can declare it in the PreferencesLogger’s constructor and Dagger will supply
constructor with SharedPreferences instance.
public class PreferencesLogger {

    private SharedPreferences pref;

    @Inject
    public PreferencesLogger(SharedPreferences pref) {
        this.pref = pref;
    }

    public void log() {
        Log.v(getClass().getSimpleName(), "Logging all preferences:");
        for (Map.Entry entry : pref.getAll().entrySet())
            Log.v(getClass().getSimpleName(), entry.getKey() + " = " + entry.getValue());
    }
}
We can go both ways - constructor argument or injectable field. Constructor arguments are usually more handy - if you inject an object through constructor you can use it right inside that constructor if you wish.
If you have @Inject haredPreferences pref field then Dagger will inject it as well, but only after
constructor’s end. This will look like this:
public class PreferencesLogger {

    @Inject SharedPreferences pref;

    @Inject
    public PreferencesLogger() {
    }

    ...
Both methods are doing the same thing. Notice that in the second case there is no private modifier -
this is because Dagger will need to access this field to make injection.
New AppComponent
@Singleton
@Component(modules = AppModule.class)
public interface AppComponent {
    void inject(MainActivity activity);
}
@Singleton says that this component will keep singletons instances inside.
(modules = AppModule.class) means that AppModule will be used for injections by AppComponent. You can enumerate several modules here, for example:
(modules = {AppModule.class, MainActivityModule.class})
If you want to inject into more than one object with this component you can write something like this:
@Singleton
@Component(modules = AppModule.class)
public interface AppComponent {
    void inject(MainActivity activity);
    void inject(MainFragment fragment);
    void inject(MainToolbarView view);
}
A new AppComponent instantiation
component = DaggerAppComponent.builder().appModule(new AppModule(this)).build();
That’s it. Now you know how to use third-party objects with Dagger 2.
Magic
Easier instantiation of Component
If you tried to use Dagger 2, then you noticed that IDE can not find DaggerAppComponent and marks it as error
with red color while the project still compiles without errors. Everything should look nice and clean,
so this issue should be somehow avoided.
One possible solution - is to use android-apt plugin.
While surfing GitHub I’ve found another interesting solution for this problem
in Mortar project (I can’t give a direct reference to the file - it moves sometimes).
I took buildComponent function that instantiates component
and copied it into my example. Dagger2Helper:
The second solution uses reflection, but it does not create any noticeable performance impact. On a slowest device that I could get it takes just about 15 ms during application startup time.
Here is how it looks like:
public class MyApplication extends Application {
    private static AppComponent component;

    @Override
    public void onCreate() {
        super.onCreate();
        // component = DaggerAppComponent.builder().appModule(new AppModule(this)).build();
        component = Dagger2Helper.buildComponent(AppComponent.class, new AppModule(this));
    }

    ...
Easier injection + inheritance
One tip of how to make injection easier is to change a little bit our injection method.
Instead of writing MyApplication.inject(...) we could write MyApplication.getComponent().inject(...)
so we do not have to bloat MyApplication. You can also extract injector and call MainInjector.getComponent().inject(...).
Another option relies on reflection, so I will describe it more verbosely.
During good old times of Dagger 1 we had only one void inject(Object object) method.
While it was not so blazing fast it was quite handy. In example, we could write inject(this) in a base class
and all subclasses would get their injections without additional Dagger calls.
It was so handy, so I decided to reproduce such behaviour.
Here is example:
public class BaseTarget {
    @Inject protected MyApplication app;

    public BaseTarget() {
        Log.v(getClass().getSimpleName(), "app before injection: " + app);
        MyApplication.getComponent().inject(this);
        Log.v(getClass().getSimpleName(), "app after injection: " + app);
    }
}
To satisfy this dependency I will just add this code to AppModule:
@Provides
MyApplication provideApp() {
    return app;
}
A subclass that should get injection without direct inject(...) call:
public class RealTarget extends BaseTarget {
    @Inject SharedPreferences pref;

    public RealTarget() {
    }

    public void check() {
        Log.v(getClass().getSimpleName(), "Base injection app: " + app);
        Log.v(getClass().getSimpleName(), "Real injection pref: " + pref);
    }
}
Calling new RealTarget().check() produces the following output:
app before injection: null
app after injection: info.android15.dagger2example.MyApplication@419412e0
Base injection app: info.android15.dagger2example.MyApplication@419412e0
Real injection pref: null
As you can see, subclass dependency SharedPreferences has not been satisfied because the classical
Dagger 2 usage pattern implies that you should call inject(...) on a RealTarget.
If you like to create things like BaseActivity, BaseCustomView, BaseAdapter, etc, this can not be satisfying.
Now I will use inject function that has been made to reproduce Dagger1 easy injections through a superclass:
Dagger2Helper:
public class MyApplication extends Application {

    ...

    public static void inject(Object target) {
        Dagger2Helper.inject(AppComponent.class, component, target);
    }
}

public class BaseTarget {
    @Inject protected MyApplication app;

    public BaseTarget() {
        Log.v(getClass().getSimpleName(), "app before injection: " + app);
        // MyApplication.getComponent().inject(this);
        MyApplication.inject(this);
        Log.v(getClass().getSimpleName(), "app after injection: " + app);
    }
}
Output:
app before injection: null
app after injection: info.android15.dagger2example.MyApplication@419430e0
Base injection app: info.android15.dagger2example.MyApplication@419430e0
Real injection pref: android.app.SharedPreferencesImpl@419630d8
Hurray! Easy injections through a base class! Yeh, but what is their price? I said “reflection” so I need to prove that it will not degrade the performance.
14.07.2015 update:
I finally came with a better solution for injection through inheritance: ComponentReflectionDelegate
Use it with APT plugin to remove errors in IDE.
Performance
For performance benchmarks I used Galaxy S - an android device of year 2010. I also created 50-method Component class to make reflection run slower. While this benchmark can not be exact because of processor cache hits and JIT, the difference should not be large.
A direct injection on a subclass takes about 0.0013 ms, a reflected injection on a superclass takes about 0.014 ms. Both prices are negligible.
For a comparison, one frame of 60 FPS animation takes 16 ms. You can make 100 reflected injections or 1000 direct injections EVERY frame during the scroll time and the user will never see the difference even on a slowest device. Typically we do not inject during scrolling - this is something we do during loading, so we can consider Dagger 2 injection to be free.
Example code
Example code is available at GitHub/konmik/Dagger2Example